Characteristics and Features of CSS
| ✅ Paper Type: Free Essay | ✅ Subject: Computer Science |
| ✅ Wordcount: 2124 words | ✅ Published: 11 Aug 2017 |
Assignment 1: P1/m1
Introduction
CSS was introduced in 1996. It was created to stop people from having to repeat a lot of code. For example, if someone wanted to change the paragraph text, they would have to do it every single time they wanted to change the properties. CSS has since become more adapted to having more features, for example you can now use the # and change the background to a massive array of colours.
What is CSS
CSS is a formatting language used to add styling to your page. This is done by having the CSS document linked into your html page. This page then has selectors and properties which affect the tags inside your html document.
Characteristics of CSS
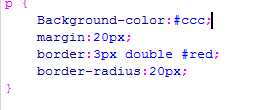
CSS is written in the following this rule:
selector {property: value;}
an example of this would be:


This would be used to change the full page to a grey colour. As you can see, the body is the selector, the rule is the background colour and the value is the colouring.
The order of operations is how the page is read and ordering the methods of formatting into importance. The order goes as follows: HTML, Inline, Internal then external.
How do we use CSS: Three ways of HTML accessing CSS
Inline
An inline style sheet only affects the tag it is in. This means that you can change small details of the page without changing everything on every single page. This is good because if you had an external style sheet/internal with everything in it. You would have to make a new tag just to change that one detail. Inline overrules external which means you can change small details.
After HTML, inline is next on the order of operations. This means that it overrules internal/external.

 This is an example of the background colour being orange on a webpage:
  As you can see, the background colour is set to orange. And this would be a standard for every page with the style sheet attached. However, if you go to the body tag in html and add this line of code a line of code that would look like this:
I would then change the colour of the background regardless of the background colour set by the external style sheet/internal.
Another example of this being used would be with font styles. You would for an external style sheet put a P value followed by the attributes like this:  and this would-be outcome:
  However, if I wanted to have a green text on one single piece of paragraph text you would then use inline styling. You would put something like this:
  and this would change the colour of what the external styesheet had set it to.
This is good because if you again had a lot of paragraph text but you needed this to be slightly different for example you wanted the size to be a little bit smaller you would then have to create a whole new tag. This way you can change a few properties and only on that one tag.
You would use internal when you only want to add a small change to a single tag. This is because inline only affects the one tag it is inside. You would not use inline when you either want to affect the full page or the full website because you would have to copy the code over and over again.
Internal
Internal styling takes place in the head of the html document. This means that if you are customising the page, you can see everything from scrolling. The internal styling is placed inside the tags.
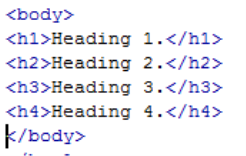
For this example, I am going to show you 4 different headings I created through internal.
I will now show you the outcome and the text inside the body.
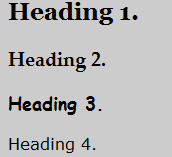
This looks simple, neat and organised because it is. Unlike inline, the styling and the tag is separate. This means that you aren’t as confused by the styling as you might be if it was inline. Both internal and external are superior for this reason.
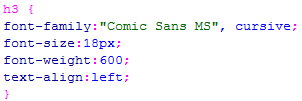
I will now she you all the styling I used to get the outcome that you previously saw:
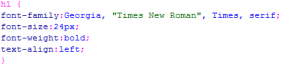

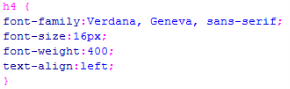
As you can see, I can add a family of fonts. This means that if one font is not supported on a user’s computer they will see a different alternative font. I added a text-align because if I wanted to add these tags inside a shape they would stick to the right of those shapes.
Font size is just formatting how big I want the text to be in opposed to how big it would default to if I left it with the html style.
An advantage to internal styling is the fact that it overrules external in the order of operations. This means that if you had one stylesheet linked to all of your pages but you wanted a few small changes you wouldn’t have to make a new stylesheet instead you can just change it in the head tag.
A disadvantage would be that internal is under inline so if you have accidentally forgotten to remove a piece of inline code you don’t want inside it you might miss it and have to go all the way through the document just to find what you are missing.
You would use internal possibly as a backup. For instance, if the external stylesheet doesn’t download properly and crash you would still see the website like normal because it would then turn to internal for the whole stylesheet. You would use inline when you want to make changes to the whole page but not every single page, like changing the font size of headings. You wouldn’t use internal when you already have an external stylesheet set up normally because it simply isn’t needed. Only as a backup.
External
External stylesheets allow someone to format their webpage (much like internal) but on a separate document. This means that you can have 2 or more workplaces (as you can link more than one stylesheet into your document) giving you a much cleaner workspace. This would be a massive advantage due to the fact that the stylesheet is easily accessable. However, it is a disadvantage because any change you make to the external stylesheet affects any html document that is linked to it.The stylesheet you attach would be a CSS document that you would use to format tags in.
In terms of the order of operation, External is last. Putting the order to: HTML, Inline, Internal and then External. This is both a positive and a negative. It is a positive because you could have something like a background image like this: 
Which would set the background to:


(and for reference if you zoomed out, it would tile)
This could then be linked to every page and would set the background image to that. But if you wanted the background to be something else, a different image, you could use inline styling on the body tag to change it to that image.


However, it could be called a negative because if you are altering someone else’s website and you wanted to use external, they may have inline which would mean you had to go through each line of code to check. Some websites have over 900 on just the HTML page.
You would use external when you want to make a stylesheet that will run on every single page (or a number of pages) because instead of having a long list of lines of code clogging up your HTML page, you would only have to deal with 1 line which would be the link to the page. You wouldn’t use external if you only have 1 page because it would be impractical to have 2 pages when only 1 will be visible. (it would be more efficient to just use internal)
Linking a stylesheet
A fully linked stylesheet looks like this:

Href:
This is the path to the stylesheet. As you can see mine just says “main.css” which means that I don’t need to go anywhere other than the file. “Main” equals filename and CSS is the document type. If for example you had to go back in the path. Before the file name, there would be a ../
This would look like this: 
And if you had to go forward in the path, you would see a /foldername then the file name. 
Type/rel
This is done just to tell older browsers/mini browsers the actual document name because it tells them the document name.
P2: Box Model
What is it?
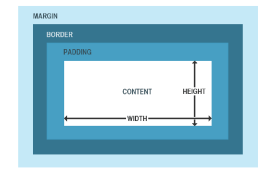
A box model is something that allows a web designer/developer to create a layout to the page. This is high in accuracy due to the fact that you can edit right left up and down pixel by pixel. You also have options between margin and padding.
Why do we use it?
You would use this model to apply accurate spacing on your objects inside the webpage. You are also then able to work out how much space has been used and gives you an option for borders.
How do we use it?
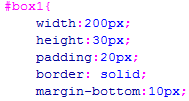
An example of when you would use a box model would be when adding in a shape. As you can see here, you would add styling to a div tag like you can see here. 
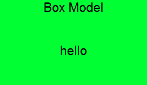 This would set the size for it but not add anything to do with the box model. This means that if you added another box, they would be directly touching. Like this.
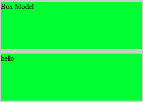
To fix this you would want to add a margin-bottom like this:

The issue would then be fixed and there will be a 10px gap between the two objects.
Content:
Content is the actual image or the text. The content is the centre of the box model and is what it is created to serve. This is because without the content there would be no need to have any spacing or any borders because there would be no item for it to be based on.
Padding:
Padding is the distance between the content and the border. This is to add inside space and make your spacing more accurate than just using margin which is the outside. An example of padding would be:
In this example, I show the use of one number in padding. This means it affects the padding of up, down, left, right. I could use 4 numbers which would affect up, down then left right like this:
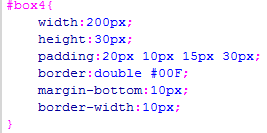
This is good because it allows a lot of choice which is very precise.
Border:
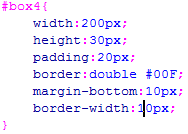
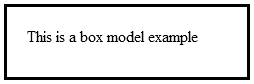
The border is the outline after the padding. Without padding, the border would take place around the content. It would look like this:

And the code will look like this:
However, to move the border location you would need to add padding. This is due to the fact that padding is inside between the content and the border. If you wanted it to move further outside, you would need to add this line of code in: 
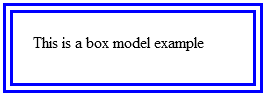
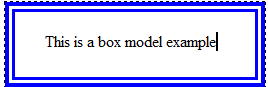
This makes the outcome look like this:

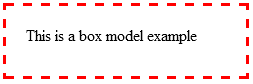
You are also able to change the border style, currently I have the double border style but that can easily be changed my altering the value. For example I could set it to dashed like this:

With the outcome of this

I will now show 4 more examples of using borders.
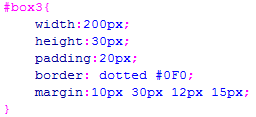
This is just a standard border with the colour defaulting to black. The margin is used to add a space between the bottom of each box.

This adds a dashed border instead of the solid style and I have changed the colour to red.
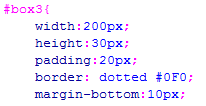
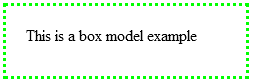
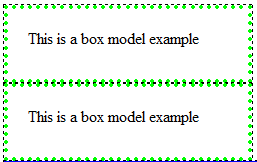
This has a bored style of dotted and the colour is set to green
The border is the ending to the content area. You can set this to be 0 px which would make the border invisible to someone viewing it. You also have the option to choose things like
Margin:
Margins are used to add outside spacing after the border between objects. This is effective because it means that you are able to have some space before the next starts. Without margin you wouldn’t be able to create a spaced website that has borders because the borders would always be touching and padding would be on the outside.
An example of margin would be this:
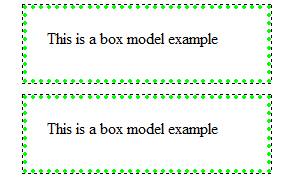
This shows spacing at the bottom without them touching. Without the margin, they would be touching which would look clunky and wouldn’t look professionally made at all. This is what it would look like without the margin being added:
Cite This Work
To export a reference to this article please select a referencing stye below:
Related Services
View all


DMCA / Removal Request
If you are the original writer of this essay and no longer wish to have your work published on UKEssays.com then please click the following link to email our support team:
Request essay removal